Setting up NUT on my Network

Uninterruptible power supplies (UPS) generally serve three purposes:
- to smooth out variations in current so that the electronics are protected
- to provide power in the event of brownouts or power outages
- to gracefully shut down connected computers and devices in the event of prolonged outages that exceed the UPS's ability to supply power.
I've used UPSs for years to meet the first two points - smoothing out variations in current and to protect against momentary power outages or brownouts. It's that third point that I've been missing for the most part.
I say, "for the most part" because I have periodically connected my UPS to a specific computer, e.g. my desktop, so that it shuts down gracefully. I didn't, however, extend that function beyond the one computer, meaning that many of my devices just got dropped when the power failed. That's a great way to bork you system!
I've had a network rack with a cable modem, router, NAS, and multiple computers all served from one UPS for several years. While the UPS would keep the systems up and running for a few minutes, I had not setup a means for gracefully shutting down all of those systems during a power failure. The UPS simply provided power to them until it couldn't. Then everything just stopped.
Not really a good plan!
So, recently I decided that it was time to up my game and ensure that my systems were more fully protected. I started with my network rack, since that's where my Proxmox and Unraid servers live and with their multiple VMs and Dockers running, the risk of corruption seemed pretty high. I do run a Proxmox Backup Server but since it lives on the same rack and is powered by the same UPS, the risk for corrupting its system was still pretty high.
I actually set up two UPSs for network use. The network rack includes a QNAP TS-230 NAS. QNAP includes a basic network UPS app so I began with that. I'll create a second post outlining how to do this using a Raspberry Pi as the NUT server.
Setting up the Network UPS server on QNAP
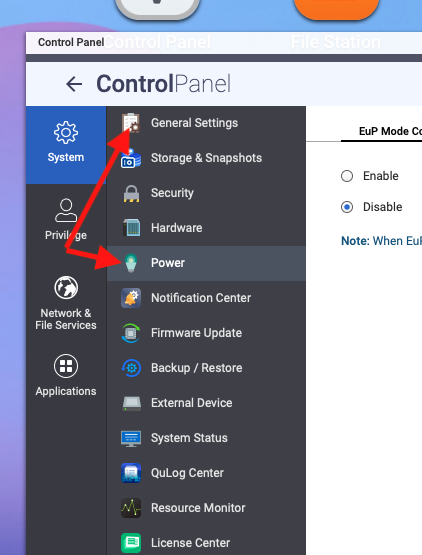
To begin, I had to locate the app. Logically, to me at least, it should live either under the General tab, or (better) under the "Power" tab on the QNAP control panel.

But, of course, that would have made sense.
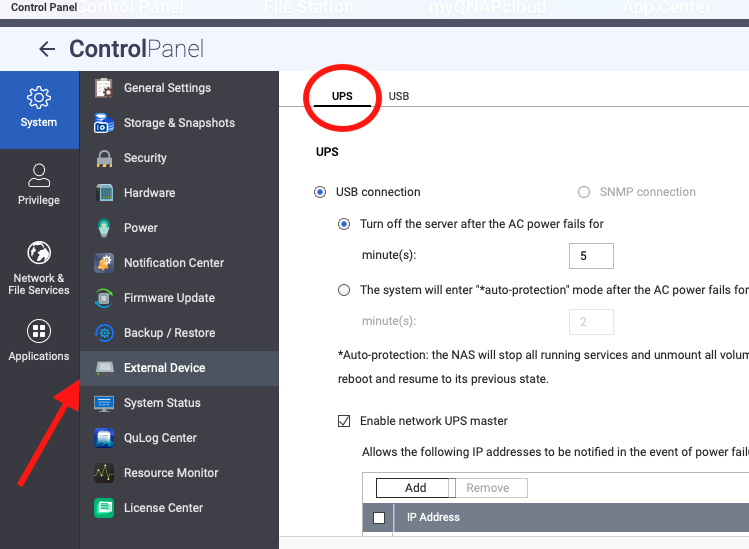
Instead, it is found under "External Devices" which, I guess, makes some sense, but is not terribly intuitive.

Once I located that, it was just a matter of plugging the USB cable from the UPS into the back of the TS-230, telling the app that the UPS was connected by USB and, away we go!
As you can see in the image above, you can set several options for the NAS. Note that these settings are for the NAS not for any connected devices.
If your NAS can identify the UPS, you'll see basic information about the UPS at the bottom of the screen:

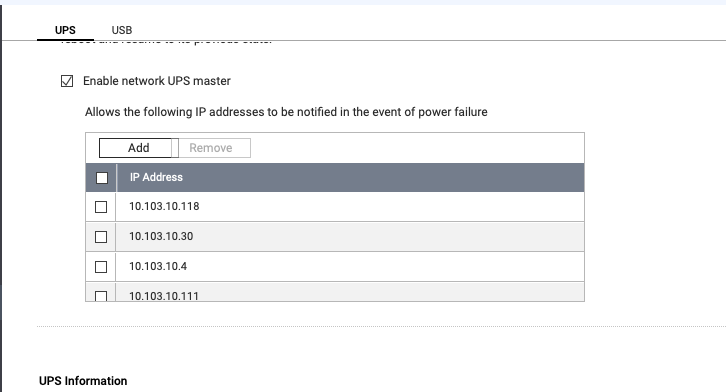
In order to use the NAS as a NUT server, you need to check the "Enable network UPS master" option, then add the machines you want to share the information with.

Setting up your clients
With the server set up, now we need to tell the client computers how to reach the server and set our parameters on what we want to happen when the power goes out.
On Proxmox and Unraid are both based on Debian so we can use APT to install the nut-client. While you can install the full nut package, it isn't really necessary since you're not using these machines as nut servers.
As always, start with updating your apt files:
Sudo apt update && Sudo apt upgradeOnce you've upgraded everything, it's simply a matter of installing nut-client:
sudo apt install nut-clientOnce the client is installed, you'll need to make a few changes to the settings to get things working. I use nano as my default editor; use whatever is your favorite editor by simply replacing 'nano' with you editor in the steps below.
set nut to be a client
cd /etc/nut
sudo cp nut.conf nut.conf.example
sudo nano nut.conf
Scroll down to find "MODE=none". Change this to: MODE=netclient
save and exit your editor.
add the monitor for your server
sudo cp upsmon.conf upsmon.conf.example
sudo nano upsmon.conf
Scroll to the bottom of the page and add:
MONITOR qnapups@<server address> 1 qnapups 123456 secondaryNote that "qnapups" is required as it is the default (and I believe hardcoded) user for the network ups server for QNAP. Replace with the address for your NAS. "123456" is the default password and "secondary" simply means that this machine is not the server.
sudo systemctl enable nut-clientBack on your QNAP NAS, ensure that your client is added to the list of machines to be notified (see above image).
you can test your settings with:
uspc qnapups@<server address>If all went well, you should get a long list of output:
battery.charge: 100
battery.charge.low: 10
battery.charge.warning: 20
battery.mfr.date: CPS
battery.runtime: 13500
battery.runtime.low: 300
battery.type: PbAcid
battery.voltage: 27.0
battery.voltage.nominal: 24
device.mfr: CPS
device.model: CST135UC2
device.serial: CDZPN7004517
device.type: ups
driver.name: usbhid-ups
driver.parameter.pollfreq: 30
driver.parameter.pollinterval: 2
driver.parameter.port: auto
driver.parameter.productid: 0601
driver.parameter.synchronous: auto
driver.parameter.vendorid: 0764
driver.version: 2.8.0
driver.version.data: CyberPower HID 0.6
driver.version.internal: 0.47
driver.version.usb: libusb-1.0.26 (API: 0x1000109)
input.voltage: 117.0
input.voltage.nominal: 120
output.voltage: 117.0
ups.beeper.status: enabled
ups.delay.shutdown: 20
ups.delay.start: 30
ups.load: 4
ups.mfr: CPS
ups.model: CST135UC2
ups.productid: 0601
ups.realpower.nominal: 810
ups.serial: CDZPN7004517
ups.status: OL
ups.test.result: No test initiated
ups.timer.shutdown: -60
ups.timer.start: -60
ups.vendorid: 0764
Troubleshooting
If you don't get output from the uspc command, double check all your settings in nut.conf and upsmon.conf and ensure that your client is listed in the computers to be notified on your QNAP NAS. This has actually been the only error I've encountered in setting up about a dozen clients.
Want to ensure that your setup works? Unplug your UPS and watch for notifications regarding power loss and imminent shutdown.